Move an on-Prem Hyper-V VM to Azure (specialized VHD)
One way to move an on-premises Hyper-V Windows virtual machine (VM) with all its user accounts, policies and applications fully intact up to Azure, is to create a specialized disk of the VM’s operating system virtual hard disk (VHD). This specialized VHD is then uploaded to Azure, after being properly prepped to work in the Azure environment and attached to a new VM.
Notes:
- Only Generation 1 Hyper-V VMs are supported on Azure. Keep this in mind when creating or are considering moving Hyper-V machines to Azure. A Generation 2 Hyper-V VM cannot be converted to a Generation 1 Hyper-V VM.
- The Hyper-V vhdx disk format must be converted to vhd, and the dynamically expanding property of the Hyper-V vhd changed to fixed-sized. This is done easily in PowerShell
- In Azure, the size of a managed or unmanaged VHD can be increased, but not decreased, so to speed the uploading time of the prepared VHD to Azure, make sure the Hyper-V VMs OS disk is as small as possible when the Hyper-VM is first created.
In the 2 sets of .vhdx drives converted to .vhd drives shown below:
W10-Test1.vhdx was a 130 GB vhdx OS system drive created in Hyper-V, that had only filled 14.585 GB of the dynamically expanding space — but when it was converted to .vhd format (see PowerShell script below) the full size of the virtual drive became a 133.169 GB vhd that would need to be uploaded to Azure.
W2016-TestvhdSize.vhdx was a 30GB vhdx OS drive created in Hyper-V that ‘grew’ to 31.457 GB when it was converted to ‘vhd format. This will upload MUCH faster to Azure — and can then have more disk space allocated to it once it is hosted in Azure.

- The converted vhd needs to be prepared (‘specialized’ only so the sys prep operation is NOT used as in generalized disks) to be able to work correctly on Azure.
- Rather than reiterating the well documented step-by-step process again in this blog — follow the directions from these 2 Microsoft Docs for Steps 2–10:
- Prepare a Windows VHD or VHDX to upload to Azure
- Create a Windows VM from a specialized disk using PowerShell
Preparation Steps for Windows Hyper-V VHD to be uploaded and running as a VM on Azure:
1. Convert Hyper-V OS’s .vhdx format disk to a .vhd format with the fixed size property (replace the source and destination path with your settings)
Convert-VHD –Path d:\hyper-v\virtualdisks\W10-Test1.vhdx `
   –DestinationPath d:\hyper-v\virtualdisks\W10-Test1.vhd `
   -VHDType Fixed
2. Set Windows Configurations required by Azure
3. Check the Windows Services — this lists a minimal set of services that must be set to the Windows default values
4. Update Remote Desktop registry settings The VHD must have the RDP connections and configurations in place for Azure
5. Configure Windows Firewall rules
6. Verify VM is healthy, secure, and accessible with RDP
7. Complete the recommended configurations NOTE: For the Proof of Concept (POC), we did NOT install the Azure VMs Agent and were able to connect via RDP to the new Azure VM created from the Hyper-V VHD. We kept getting an error in Azure saying that the Azure agents couldn’t be found or were not activated.
8. Upload the specialized VHD (I uploaded the specialized VHD to an Azure Storage Account via Microsoft Azure Software Explorer)
9. Create a managed disk from the VHD
The system name for the new Azure VM retains the same internal name as the original VM on Hyper-V, and all of the user accounts, applications, and data — now running without any needed fine tuning or tweaking, in Azure.

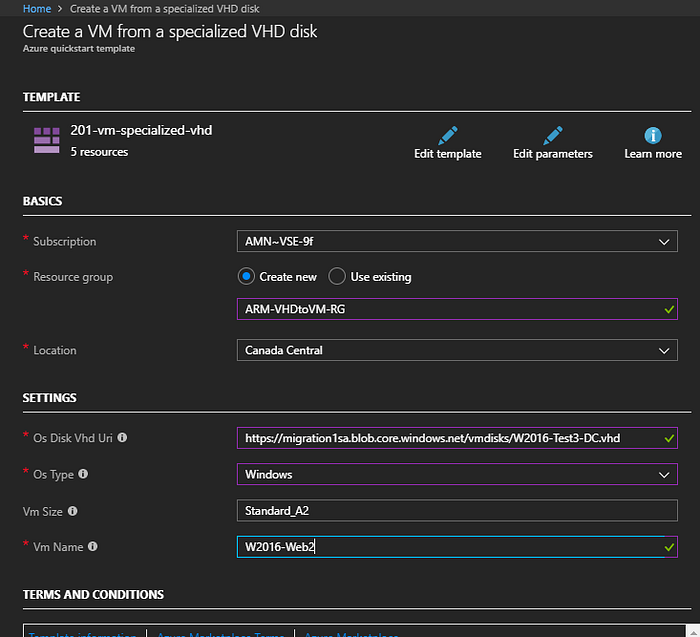
Here is the link to an ARM template posted in the Azure Quickstart Templates by Kay Singh that does Steps 8–10 for us — in less than 2 minutes! You still need to prep the Hyper-V specialized disk…but this ARM template can be used to create a VM from ANY uploaded, unattached specialized VHD!
ARM Template — Create a VM from a specialized VHD disk
Originally published at https://arlanblogs.alvarnet.com on April 23, 2018.
